Please note this article only applies if you are subscribed to Salestracker’s CRM functionality, as the process described in this article cannot be followed if you are subscribed to the data-only version of Salestracker.
Orders are tied to records. First, find a record where you want to create a new order and bring it up on screen.
Once you have the record in front of you, create a order by clicking the “Create new order” button. This button can be found on the “Orders” tab, in the top left.

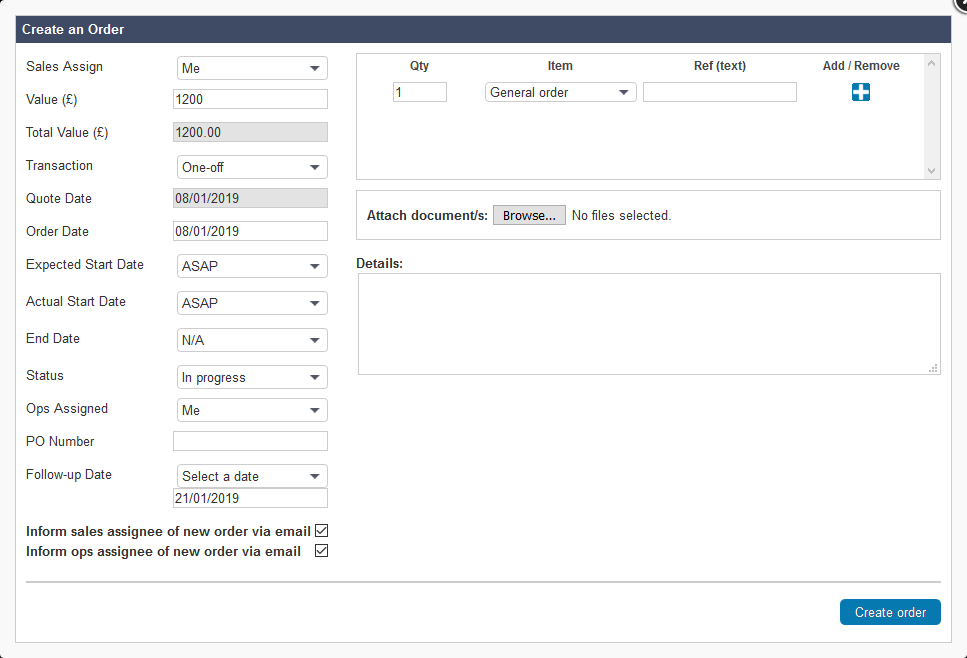
Clicking this button will bring up a pop-up window:

What follows in an explanation of each part, starting with the left panel for order details:
- Sales Assign – select which user on your subscription to assign the order to. It will then appear in their Orders Overview once saved.
- Value – the value per period for this order
- Total Value – the calculated total for the order by multiplying the value above with the no of transactions (if relevant) below
- Transaction – the recurrence pattern for this order (Daily, Monthly, Rolling, One-off etc.)
- No. of Transactions – if Monthly or Daily are selected above, this field will show and this is how many days/months the order will last for. If neither Monthly or Daily are selected, this field will be defaulted to 1 and will be hidden.
- Quote date – this is set to today’s date
- Order date – this is set to today’s date by default.
- Expected Start Date – the date when the order is expected to start.
- Actual Start Date – the date when the order actually came into effect.
- End Date – the date when the order should come to an end.
- Status – “In progress” or “On hold”, either the order has already started and is in progress or the order isn’t due to start yet and is on hold.
- PO Number – purchase order number.
- Follow-up date – the date the lead is due to be followed-up on. This can either be today or a date in the future.
- Inform assignee of new quote via email – ticking this box will send the person the lead is assigned to to inform them of the new quote. This box will tick itself if you select an assignee other than yourself – you can untick it again if you so wish to do so.
- Send email reminder on follow-up day – ticking this box will prompt Salestracker to send the assignee a reminder email on the day the quote is due to be followed-up on. This box will tick itself if you choose a date later than today, but you can untick it again if you so wish to do so.
The following describe the order items section:
- Qty – how many of this item is included in this order
- Item – what is the item being added to the order
- Ref – your personal reference for this item (this could be based on an invoice or similar you have)
The documents section enables you to upload documents for this order specifically, for instance an invoice for the items associated, a transcript of the order arrangement, screenshots etc.
The details section serves as a general notes section where you can write any notes you wish to be associated with the order.
Once you have entered all the order details, click the “Create order” button in the lower-right of the pop-up box to save the order.
Once saved, the order will appear in the Order Summary (if you have assigned it to yourself) and on the record itself under the “Orders” tab.


