Every company inside Salestracker, whether it is a company you have added into “My Data” or a company on one of the Insight databases, has a “record” on Salestracker. Viewing a company is a case of accessing the “record view”. It looks complicated at first, but once broken down into chunks, it is in-fact quite straight forward.
The following diagram is numbered, and the list underneath will explain further what each part of the record view does.
![]()
-
- The title of the record tells you which database it is in and what the name of the company is. In this example the database is “Fenestration (UK)” and the company name is “Sample Record” (it is just a record we have created as an example!).
- The “Business” tab is what shows by default when looking at a record, and gives you an overview of the company’s contact details as well as limited CRM functions.
- The “Contacts” tab displays any contacts that have been added to the record, with the ability to add a new private contact. With “My Data” records this tab isn’t display, instead the contacts are shown in place of #25 below.
- The “Products” (or “Sectors“) tab will show a rundown of what products the company produces OR what sector they serve depending on what database this company is part of. Please note that “My Data” records will not have a product or sector tab.
- The “Custom” tab displays any custom fields you have added in “Preferences” > “CRM Custom Tab Customisation“. Find out more by reading the “CRM Custom Tab Customisation” article.
- The “Activity” tab gives an overview of liaisons with this company or actions taken. Find out more by reading the “Activity (Notes)” article.
- The “Tasks” tab gives an overview of tasks to be undertaken in relation to this company (e.g. call one of the contacts at the company). Find out more by reading the “Tasks Overview” article and the “Create a New Task” article.
- The “Leads” tab gives an overview of potential business transactions with this company. Find out more by reading the “Leads Overview” article and the “Create a New Lead” article.
- The “Quotes” tab gives an overview of potential business transactions with this company. Find out more by reading the “Quotes Overview” article and the “Create a New Quote” article.
- The “Orders” tab gives an overview of potential business transactions with this company. Find out more by reading the “Orders Overview” article and the “Create a New Orders” article.
- The “Documents” tab allows you to upload and view documents associated with this company (e.g. quotes). Find out more by reading the “Documents” article.
- The “Map” tab will display a Google Map view for the record.
- This button opens a copy of the record in a new window in case you need to go to another page but still require the record to be open for reference.
- The “Return” button will bring you back to the previous page, depending on where you came from e.g. search results, relationships, in a list, etc.
- The “PDF” button will generate a PDF of this record that you can save or print to your computer.
- The button with the printer icon will print the current open tab.
- The “Rewind” button will take you back to the first record in the current list (if you are viewing the record as part of a list).
- The “Previous” button will take you back to the previous record in the current list (if you are viewing the record as part of a list).
- The “Next” button will take you back to the next record in the current list (if you are viewing the record as part of a list).
- The “Fast-Forward” button will take you back to the last record in the current list (if you are viewing the record as part of a list).
- The “Contact Details” box contains contact/address information for the company. Ticking the “Do not contact this business” box will flag the record as one to be suppressed from lists by default by changing the record’s relationship status to “Do not contact”.
- The “Business Details” box features extra information about the business as well as credit data (if available). Please note that the credit data we show is provided via a third-party and we can not vouch for its accuracy. For “My Data” records, this box becomes the “Operations” box which contains the buttons described in #20, albeit with an “Update Record” button instead of a “Query Details?” button to allow you to edit the record.
- The Sidebar Widget contains three separate boxes. Find out more about them in the section below.
- The Operations buttons allow you to:
- Send a query to our research team regarding the record e.g. if you think the address is incorrect, click the “Found an error?” button. A pop-up window will appear. Select a reason for your query, enter your query details and tick whether you would like to hear the outcome of your query, then click on the “Send request” button.
- The “Create new task” button prompts you to create a new task.
- The “Create new lead” button prompts you to create a new lead.
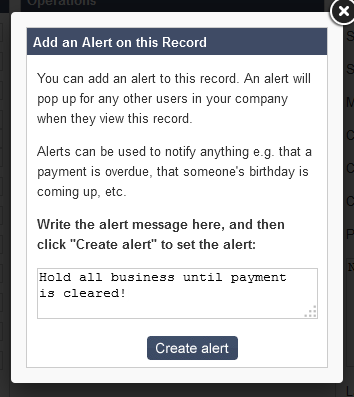
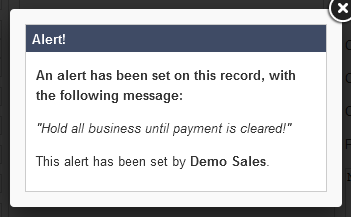
- The “Create an alert” button allows you to set an alert on this record – read on further for more details.
- “My Data” records will have an “Update Record” button too (instead of “Found an error?”), which allows you to edit the record details.
- Contacts associated with this record are shown here. “My Data” records allow you to add new contacts, edit existing ones (the green “<>” button) or delete them (the red “X” button), however with other database records, this is replaced with a link, “View contacts for this record” which will redirect the user to the “Contacts” tab.
Sidebar Widgets (#23)
This box allows you to switch between three different “widgets” by clicking on the arrows in the top right to switch between the three.
![]()
To set which widget you want to show on the record view by default, tick the box next to the widget name.
![]()
The three widgets include the following…
Relationship Widget
![]()
This widget can be used to track your company’s current status with the company in the record. You can read the dedicated article on relationships here and how to create or update them here.
Hotlists Widget
![]()
This widget allows you to create custom lists, with tickboxes to add the current record to any existing lists. Find out about hotlists in this dedicated article.
Connections Widget
![]()
This widget allows you to record social media links related to the company as required – simply type them into the relevant box and click the “Save” button.
A black arrow icon will appear next to addresses you have entered – click on this to be taken to that page in a new tab.
Create an Alert (#24)
If there is a pertinent bit of important information you need to convey to other users on your subscription about this company (e.g. defaulting on payments), you can set an “alert” on the record. Start by clicking on the “Create an alert” button. A pop-up box will appear:

Fill in the details of the alert and then click “Create alert” to set it. Now whenever another user visits this record, they will see the alert message pop up on the record.

If an alert is already set on a record, the “Create alert” button will be replaced by two others: “View alert” and “Turn off alert“. The former brings up the alert that has been set so you can view it again, the latter turns off the alert so it no longer appears when users view this record.


